Maximum Potential Calisthenics
Search
Close this search box.

Pistol Squat – The Ultimate Progression Guide

A Pistol Squat is a strength-based exercise where you squat on one leg with the other leg extended straight out in front.

When you reach your lowest point, your body resembles a pistol shape. 

The Pistol Squat is one of the most difficult bodyweight leg exercises to master.  It requires strength, stability, and mobility, it is the ultimate exercise in bodyweight leg strength.

Pistol Squat Form

Safe Form

This is the minimum required form to avoid injury and keep the squat safe:

1. Knee Tracks the Line of Your Toes

Keep the middle of your knee in line with your toes, don't allow it to roll in. This will help protect your knee, maintaining a safe range of movement.

2. Keep Your Heel on the Ground

Your squatting leg should keep the heel firmly on the ground. This will reduce pressure on your ankle and knee.

Strict Form

This is the form that we all should aspire to.

Some of these require near perfect mobility in the ankle and hips as well as huge amounts of strength.

1. Keep Your Non-Working Knee Straight

Keeping the knee straight requires good flexibility in the hamstrings as well as excellent motor control in the hip flexors and quads.

2. Pause Briefly in the Bottom Position

This will stop you bouncing back up, using momentum. A one-second pause is enough.

3. Keep Your Non-Working Leg Parallel to the Floor

In the start position lift your non-working leg until it is parallel to the floor. Maintain this position throughout the movement.

Progressions

In order to progress to a pistol squat safely, move through the following progressions. You should be able to do each one without any issues before moving to the next. Please note, if you have an injury or are new to exercise please consult a physio or your doctor before attempting any exercises outlined here.

Step 1 – Bodyweight Squat

The first progression is to do simple bodyweight squats. Check out our beginner’s guide for detailed instructions on the bodyweight squat.
Bodyweight Squat

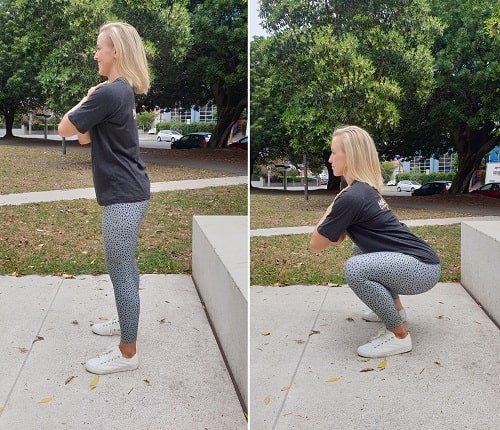
Step 2 – Static Lunge

The static lunge is the first progression we use to make the squat use one leg more than the other. Remember to perform the exercise with both legs.
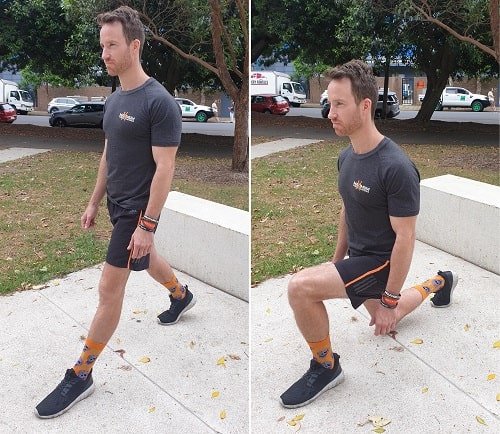
 Static Lunge

Start Position

  • Stand shoulder-width apart, arms on hip.
  • Take a deep stride forward.
  • This is the start position.

Execution

  • Squat down until your knee touches the ground.
  • Push through your heel and return to the start position.

Step 3 – Bulgarian Split Squat

With the Bulgarian Sqlit Squat, we are elevating the back leg, to put more weight through the working leg.
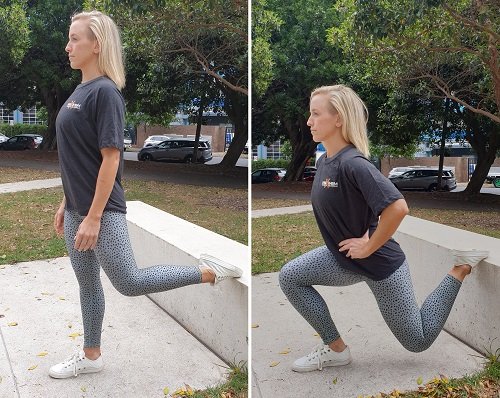
 Bulgarian Split Squat

Start Position

  • Put one foot on an elevated object such as a bench.
  • Take a deep stride forward with the other leg.
  • This is the start position.

Execution

  • Squat down until your knee touches the ground.
  • Push through your heel and return to the start position.

Step 4 – Single Leg Step Down

The single leg step is the first single leg exercise. It is great for building stability and can easily be progressed from beginner to advanced levels.
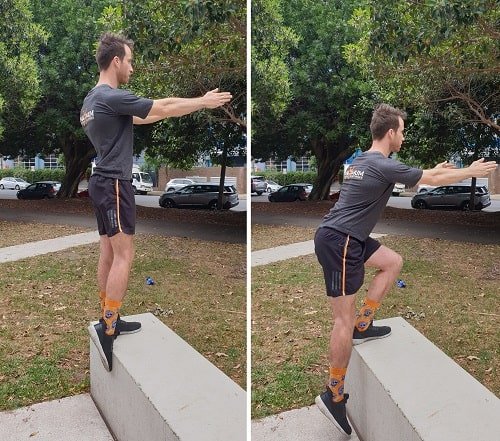
 Single Leg Step Down

Start Position

  • Stand on one leg on an elevated object such as a bench with your heals at the edge.
  • Put your arms out in front of you help with your balance.

Execution

  • Step your non-working leg back off the object as low as you can maintain your stability.
  • If you reach the ground, then make sure you tap the toe without pushing off the ground.
  • Push through your heel (of the working leg) and return to the start position.
To increase the difficulty simply step further down (use a higher object if you’re reaching the floor).

Step 5 – Partial Pistol Squat

The partial pistol squat is the first progression where we are now using the form of a pistol squat. We are going to use a decreased range of motion to make it accessible. Partial Pistol Squat

Start Position

  • Stand in front of an object such as a bench.
  • Lift one leg out in front of you, try to keep the knee straight.
  • Put your arms out in front of you to help with your balance.

Execution

  • Squat down onto the bench with your working leg.
  • Push through the heel and return to the start position.
This can be progressed from a quite high object all the way to the ground, however once you are doing it at just below knee height, then I recommend switching to the next progression.

Step 6 – Assisted Pistol Squat

With assisted pistol squats, we are increasing the range of motion so that we can get all the way to the ground. You can use a partner, a pole, TRX, anything that you can hold onto all the way down into the pistol squat.
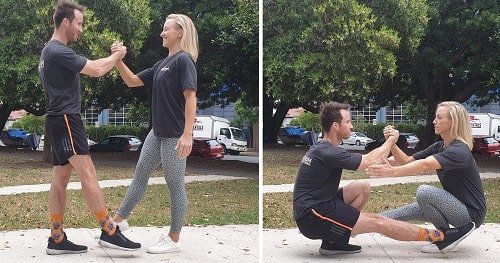
 Partner Pistol Squat

Start Position

  • Stand in front of your chosen assistance.
  • Hold on with one or two arms depending on how much assistance is required.
  • Lift one leg out in front of you, try to keep the knee straight.
  • If holding with one arm, then put the other out in front to assist with balance.

Execution

  • Squat down with your working leg until your hamstring touches your calf.
  • Push through your heel and return to the start position.
  • Use as much or as little assistance as required.
Assisted Pistol Squat

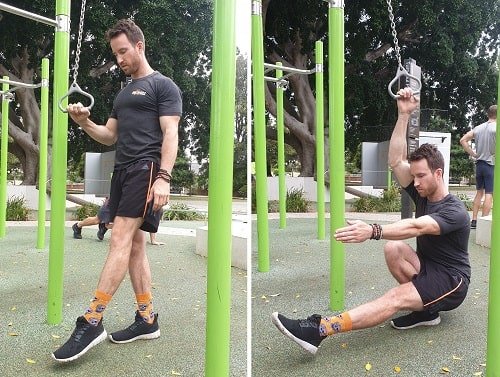
Step 7 – Elevated Pistol Squat

Once the assisted pistol squats are becoming too easy, it’s time to try it without any assistance. Depending on your strengths and weaknesses, you may find the Wushu Pistol Squat easier than this one. This progression allows you to take the non-working leg below ground level to make the full pistol a little easier.
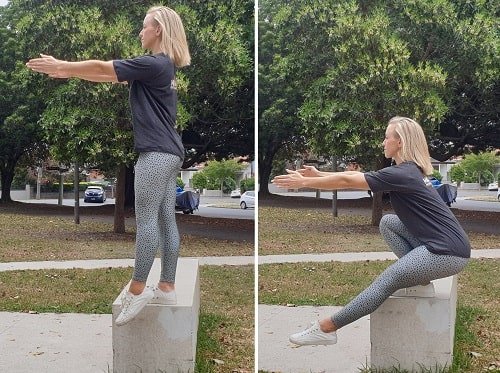
 Elevated Pistol Squat

Start Position

  • Stand on an object such as a bench, with the insole of your working foot on the edge.
  • The other leg should be out in front of you.
  • Put your arms out in front of you to help with your balance.

Execution

  • Squat down with your working leg, allow the non working leg to go below ground level if required.
  • Push through your heel and squat back up to the start position.

Step 8 – Wushu Pistol Squat

The Wushu Pistol Squat involves holding onto the toes of your non-working leg, which will make it a little easier.
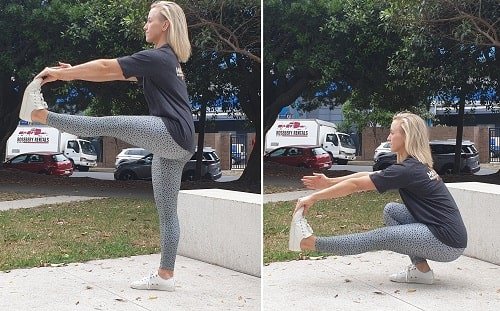
 Wushu Pistol Squat

Start Position

  • Hold your non-working toes with the same hand.
  • Try to keep the knee straight if you can.
  • Place the other arm alongside the foot and hand to help with balance.

Execution

  • Squat down with your working leg, keep a hold of your toes throughout the movment.
  • Push through your heel and squat back up to the start position.

Step 9 – Pistol Squat

Once the Elevated Pistol Squats and Wushu Pistol Squats are becoming too easy it’s time to go for the full pistol squat. Depending on your level, you may be able to skip straight onto the strict pistol. For the non-strict version, we allow you to bend the knee and to not maintain the leg parallel to the ground throughout.
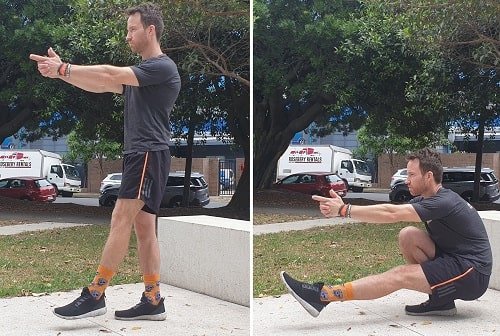
 Pistol Squat

Start Position

  • Put your non-working leg out in front of you, as high as you can manage, try to keep the knee straight.
  • Place your arms out in front to help with balance.

Execution

  • Squat down with your working leg, try to keep your non-working leg straight and high.
  • Push through your heel and squat back up to the start position.

Step 10 – Strict Pistol Squat

In order to perform a strict pistol squat, your non-working leg must stay parallel and straight.

Start Position

  • Put your non-working leg out in front of you, parallel to the ground, keep the knee straight.
  • Place your arms out in front to help with balance.

Execution

  • Squat down with your working leg, keeo your non-working leg parallel to the ground and knee straight throughout the movement.
  • Take a brief pause.
  • Push through your heel and squat back up to the start position.

Beyond The Pistol Squat

The strict pistol squat is one of the hardest bodyweight leg exercises, requiring great levels of balance, strength and mobility.

Once you’ve worked your way through these progressions, you will have unlocked an impressive strength feat.

However, we’re not done there. There are still few more advanced exercises you could try:

Shrimp Squat

Leg behind you instead of infront, works the glutes a lot more than the pistol.

Turbo Shrimp Squat

Doing a shrimp squat off an elevation, so that you can get a bigger range of motion.

Shaolin Pistol Squat

Instead of putting the leg out in front, we cross on top of the working leg.

Dragon Pistol Squat

The non-working leg goes behind and to the other side of your squatting leg

Know of anymore advanced leg exercises we’ve missed? Drop it in the comments and we’ll check it out.

Calisthenics Leg Workout

Looking to build your leg strenth through Calisthenics?

Take a look at the Calisthenics leg workout article.

  • Common questions answered about working out your legs with calisthenics
  • Progressions/ exercises by level
  • Free workout download
Dave Mace Maximum Potential Calisthenics

Leave a Reply

Related Posts

step downs calisthenics exercise with river in the background

Calisthenics Leg Workout

All the essential information you need to know about doing a calisthenics leg workout. BONUS: Check out the free calisthenics leg workout session available for

Read More »