Once you can perform Pike Push-ups with your hips directly above your shoulders, you are ready to start working on handstand push-ups.
Another prerequisite for this is that you can comfortably get into a wall handstand and hold for at least 30 seconds.
Muscles Worked
Primary
Anterior deltoid (front)
Triceps brachii
Secondary (Synergists)
Pectoralis major, clavicular (upper)
Deltoid lateral (middle)
Trapezius, middle and lower
Serratus anterior, inferior (lower)
Stabilisers (Fixators)
Trapezius, upper
Levator scapulae
Quadriceps
Iliopsoas
Tensor fasciae latae
Sartorius
Rectus abdominis
Obliques
Instructions
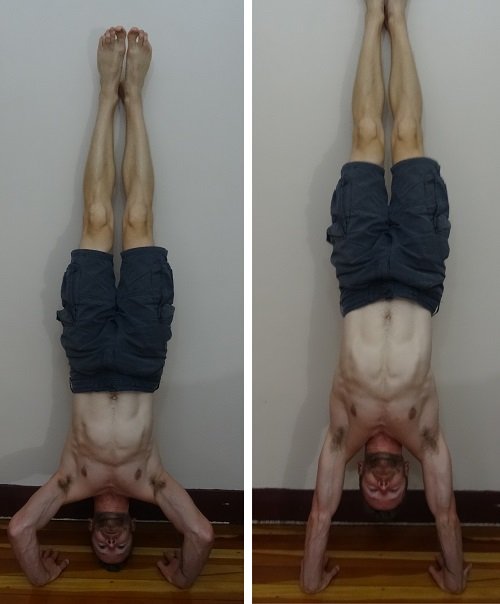
Start Position
- Kick up into a handstand against a wall.
Execution
- Bend your arms and lower yourself under control until you reach the required range of motion (see progression / regression).
- Push yourself back up to the start position.
Handstand Push-up Form
Arched or Straight Back?
The arched back handstand is an easier option for those who have limited overhead mobility.
By arching your back, you will also get a little assistance from your upper pectoral muscles, making it easier.
However, ensure you don’t arch too much, otherwise you could put too much pressure on your lumbar spine (lower back).
Squeeze your abs tight to help prevent this and bring the arms more overhead in the start position.
The straight back handstand is the gold standard for gymnastics.
It requires very good overhead mobility and strong shoulders.
Kipping
There is an alternative, power based equivalent to the handstand push-up, whereby you kick your legs up at the bottom position.
This is similar to kipping in a pull-up.
Some will call it cheating, others will tell you it turns it into a full body exercise.
My own personal view is that kipping eliminates the benefits of doing handstand push-ups in the first place.
If you’re not strong enough to do handstand push-ups, simply progress through pike push-ups instead.
Elbow Position
Elbows should stay in line with your hands throughout the movement, don’t flare them out.
This will focus on your triceps, as well as keeping your shoulder joint stable.
Hand Position
Your hands should be shoulder-width apart. This is the strongest most stable position for your shoulders.
Breathing
Breathe in during the eccentric phase (lowering yourself), breathe out during the concentric phase (pushing yourself back up).
Try to breathe through your stomach rather than chest to get more strength from your abdominal muscles.
Cadence
Ideally you want to be aiming for 2-1-2, that is two seconds down, one second hold, two seconds back up.
Progression / Regression
Range of Motion
The easiest way to progress to a full handstand push-up is to simply increase the range of motion over time.
Use an object underneath you to keep track of your progress.
Starting with something that only gives you a few inches of movement, such as a football or basketball.
Once you reach your reps and sets range for your goal, then progress to a smaller object.
Eventually you may find that you want to increase your ROM further by elevating your hands.
Make sure the object you use is stable and won’t move as you execute your handstand push-ups.
Hand Position
Close grip handstand push-ups are an awesome test of strength.
Start by moving them a little closer together.
Over time increase this until they are next to each other.
Elbow Position
Flaring your elbows out a little will allow your lateral deltoid to give more assistance, making it easier.
To keep the shoulder joint stable, try to restrict this to no more than 45 degrees.
Free-standing
For the ultimate test of full body stability and shoulder strength, take away the wall!
Free-standing handstand push-ups are an extremely advanced exercise.
If you reach this level, then congratulate yourself, as you have joined the elite calisthenics club!