TL;DR
All modalities teach handstands differently, but the essence is often the same. To be able to balance on the hands, one must control multiple pivot points in order to remain up-side down. The seven pivot points are the hands, elbows, shoulders, spine, hips, knees, and feet.
A person’s balance will change if one of these pivot points is adjusted without one or more of the other pivot points compensating for this adjustment.
Before you start to handstand, learn balance control by first attempting the Kakasana, or crow-pose. Other elements holding people back from handstand mastery are breath control and ‘The Fear’.
But... Everyone Teach Handstands Differently!!
Sifting through the endless articles regarding learning to handstand can be a motivation killer.
Largely because there are a multitude of different modalities that you can follow in order to learn this complex skill.
Many people try yoga, cross-fit, gymnastics, calisthenics, circus. Or, there are handstand purists.
It’s so easy to get lost, that’s why I’m making this article.
Designed to cut through the crap and simplify things, we won’t be teaching a certain type of handstand or even specifically how to achieve a handstand. Instead, we will have a look at a few fundamentals of hand-balancing, assessing what all modalities have in common so that you can better simplify an otherwise difficult skill.
If you live in Sydney, come to one of our workshops to practice everything!
The 7 Pivot Points

When you are upside down, it is often difficult to navigate what is happening to your body, and why it is happening.
This is due to the seven pivot points of the body.
Movement of the hands, elbows, shoulders, spine, hips, knees, and feet will all affect your balance. Sure, the spine may not exactly be a ‘pivot point’, but movement throughout the length of your spine greatly affects the handstand position that you will achieve.
When we are hand-balancing, we are balancing on our hands. Duh!
Knowing this, we must evaluate that our balancing platform extends from the tips of our fingers through to the base of our palms.
Regardless of where our pivot points are, a sense of balance in our hands will occur when we have distributed the weight of our body evenly over the surface of our hands.
Simply put, we want half of our body-weight positioned in the front half of our hands & the other half of our body-weight positioned in the rear half of our hands. If one of these pivot points is adjusted without one or more of the other pivot points adjusted, we will fall.
The same can be said for how we adjust our position while we are standing upright, on our feet.
Test it!
Stand upright & maintain equal balance along the length of your feet, 50% of your weight in your toes, 50% in your heels.
If you now raise one arm in front of you and have maintained balance, you will have either shifted more weight into your heels, or you will have compensated by other means.
1. Mastering the Art of Balance: Essential Techniques
No matter the modality that you follow, controlling balance is the linchpin for handstands.
As mentioned previously, our balancing platform extends from the tips of our fingers through to the base of our palms. Knowing this, balancing on our hands can be made much easier by embracing a position from yoga.
That exercise is the Kakasana, (sometimes called the crow-pose or crow-stand).
By adopting a much lower centre of gravity in the Kakasana, we can easily overcome fear, and simply focus on balancing.
To control your position in Kakasana, consider these 3 pivot points.
Hands
Hips
Shoulders
First, let's start with the hands.
1. Hands
When you balance on your hands, you will exhibit control through the fingers by adopting the spider stance, also known as cambered hands. Some people may struggle to create this position in the fingers, but keep at it. By positioning your fingers this way, you will find that you have greater leverage in your finger-tips, improving your control when you over-balance.
This action is due to weight distribution in the hands, as mentioned previously in “The 7 Pivot Points”.
If you over-balance (vs under-balance), you will need to transfer more force through your fingertips, in order to re-balance. Don’t overdo it though, if you transfer that weight away from your fingertips too late, you will likely under-balance & be forced to exit the Kakasana.
2. Hips
In order to create stability in the hips in Kakasana, allow friction do the hard work.
i) Crouch on the balls of your feet and place the hands on the ground, approximately shoulder width apart.
ii) With your legs straddling the outside of your arms, line up the points of your elbows with the inside of your knees.
iii) Press outward with your elbows while simultaneously pressing inward with your knees.
This will create the friction that you need in order to stabilise your hips.
3. Shoulders
To create stability in the shoulders, push upward through your shoulder blades, into protraction.
If your shoulder blades are allowed to move through protraction, neutral and retraction, this can negatively affect your balance. The same can be said for a handstand. In a handstand though, you should predominantly be elevated in the shoulder blades, any deviation towards depression can negatively affect your balance.
2. Mastering the Discipline of Breath Control
No matter the modality that you follow, breathing is essential in remaining upside down.
One of the biggest elements of hand-balancing is learning to breathe whilst you manipulate your body’s position in space. The fact is, when you first learn to handstand, your proprioception is going to need a lot of work.
In the early stages of learning your brain will be bombarded with so much new information that it will struggle to keep everything in check.
If it’s not thinking about gripping the floor, it’s focusing on pushing up through the shoulders. When the focus moves towards keeping the abs engaged in a posterior pelvic tilt, it realises that you’re accidentally piking at the hips and need to push the hips forward. All of a sudden, there’s too much weight in the palms of the hands and, to compensate, you sink down into the shoulders to try and maintain balance.
This narrative can happen in the space of 1 second, or 20 seconds.
If it’s happened in the space of 20 seconds, and you still haven’t taken a breath… Well, you’re in trouble. If you do this, you will inevitably need to take a BIG breath out. This large breath will likely result in relaxation of the rib cage, which is hard to compensate for.

brreeeaaathe
Learn to breathe properly in a headstand or in a wall handstand first, then transfer that skill to the freestanding handstand.
Breathing properly means that you are taking deep, measured breaths, through your abdomen. If you don’t care what your handstand looks like and are happy for a banana, you can probably disregard a lot of what I say here. If, on the other hand, you want a strict and straight handstand, you will need to learn to breathe whilst keeping a rigid core & back position.
Maintaining a hollow body position (posterior pelvic tilt) will stop your lower back from arching. For many people though, the arch will exist further up the spine, towards the middle back. Breathing through your chest will affect your middle spine area, and more than likely, flaring of your rib cage will ensue.
To stop this from happening, a good cue is to think about either “pulling your rib cage in”, “activating your intercostal muscles” or, my favourite, “cross-eyeing your nipples”. With your posterior pelvic tilt engaged and your nipples cross-eyed, you will have a much straighter handstand.
Why Can't I Do This?
There are multiple factors why people struggle to adopt this position.
A few of these are:
Immobile back or shoulders
Insufficient shoulder elevation strength
Poor breath control
Insufficient intercostal muscle strength
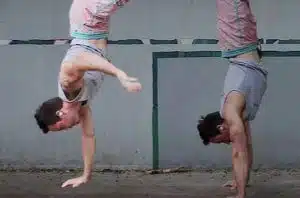
3. Mastering Your Fear
No matter the modality, reducing fear is indispensable for balance control.
Fear is often a huge milestone to cross, but the benefits of overpowering this mental obstacle cannot be overstated because when you have ‘The Fear’ in you, your handstand entry will always be manipulated in such a way that restricts you from fully committing.
While there are multiple different methods that people use to exit a handstand, the safest method is always the best.
There is a movement in gymnastics called a ’round off’ which most closely resembles the bail-out technique we use in our classes. As always, the gymnastics round off must be pleasing to the eye and be approaching perfect form, whereas for the way we teach the bail-out, safety comes first.
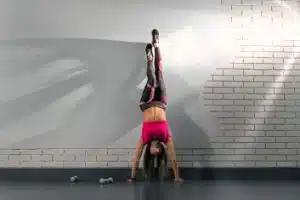
Bring It All Together!
Once you have better hand control, breath control, and have reduced your fear level; it’s time to bring it all together.
With the knowledge of how your pivot points affect each other, as well as your balance, you’re ready to attack harder hand-balancing positions.
Following the progressions in this video will allow you to slowly become more comfortable with the handstand while also building the required strength and proprioception to fully master the complexity of the handstand.
If you’re lucky enough to be in the greater Sydney region, a hands-on approach at one of our workshops will have you feeling more confident in no time.
Want more? Receive expert instruction at one of our workshops.