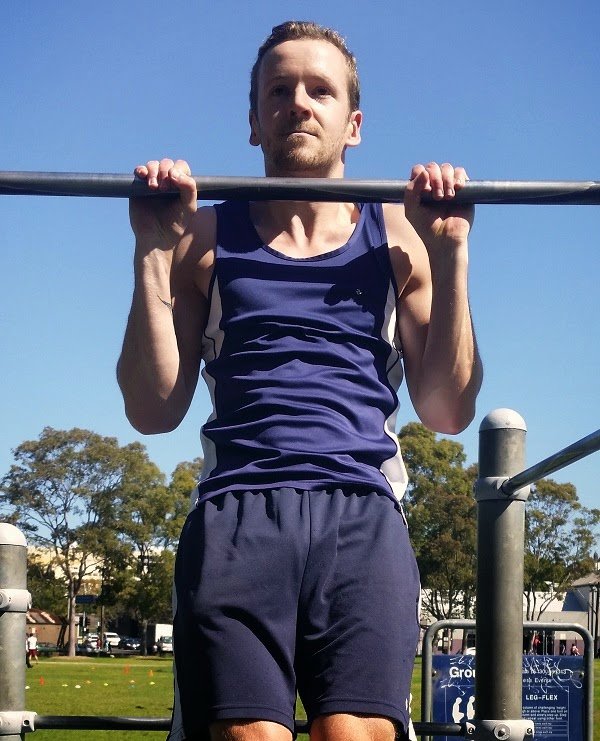
Before beginning these progressions towards your first pull-up, I advise that you work through the beginners calisthenics tutorial in particular the inverted rows will help you make good progress with the pull-up progressions.
If you’re looking for more detailed information on pull-up form and which to use for specific goals, then check out this post on pull-up form variations.
Muscles Worked
Primary
Biceps brachii
Latissimus Dorsi
Secondary (Synergists)
Posterior Deltoid
Brachialis
Brachioradialis
Teres Major
Infraspinatus
Teres Minor
Rhomboids
Levator Scapulae
Trapezius
Pectoralis Minor
Stabilizers (Fixators)
Erector spinae
Rectus abdominis
Chin-up or Pull-up
Within the fitness industry it is common to hear an underhand grip pull-up referred to as a chin-up and an overhand grip pull-up referred to as a pull-up.
Whilst I do use this terminology from time to time, I think it can be a little confusing.
When performing a chin-up you are pulling yourself up, and when doing a pull-up you are aiming to get your chin over the bar.
For the purposes of this tutorial, I will refer to them as pull-ups with the appropriate grip.
Different Grips
There are three main grips used in the pull-up, that is the underhand grip, the overhand grip and the neutral grip.
Overhand Grip
The hardest of the pull-up grips, your palms should be facing away from you; this grip emphasises your lats over your biceps.
I personally prefer to hook my thumb underneath to give me extra grip but this is up to you, go with whatever feels natural.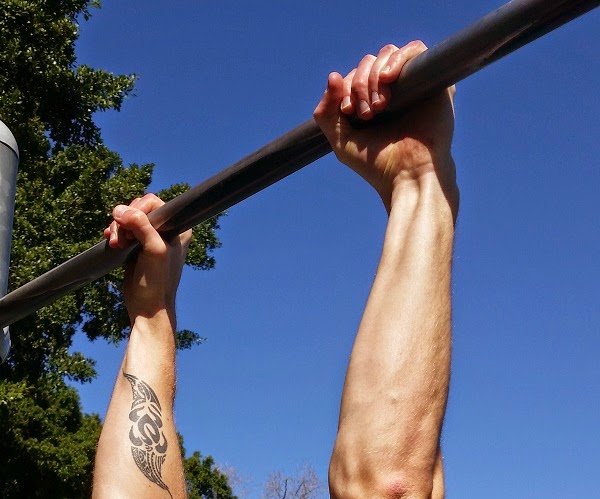
Underhand Grip
Easier than overhand, your palms should be facing you; this grip puts more emphasis on your biceps.
Neutral Grip
The best grip for beginners, your palms should be facing each other.
This grip generally puts less pressure on your elbows and shoulders and for that reason I recommend this if possible to begin with.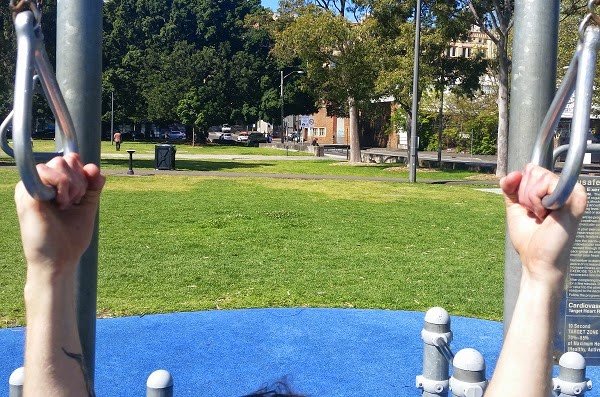
Range of Motion
I often see people in the park hitting the bar and doing a dozen or so pull-ups. However, they’re not getting the full gains of a pull-up, as they’re only doing partial reps.
So what is full range?
Your arms should start with a tiny, barely noticeable kink in the elbow. Don’t fully lock them out otherwise this puts too much pressure on the elbow.
You haven’t finished your rep until you have pulled the bar beneath your chin.
That’s right the bar goes beneath your chin, why not the other way around?
Another common mistake I see is people moving their chin up to try get a little extra height.
I don’t recommend doing this, it puts unnecessary strain on your neck and means you haven’t actually completed the full range of motion, you’ve cheated!
Kipping
To assist getting up to the bar, some athletes use a big swing and/or kick up with their knees; this is referred to as kipping.
I don’t recommend this when learning pull-ups, all it does is encourage poor form and rely less on your upper body strength; if you need to kip then drop it back down to assisted pull-ups.
Your legs should not move whilst performing a pull-up, some people like to cross them behind their body to stop this, I prefer to keep my legs straight.
Experiment, see what works for you.
After you’ve managed to perform 5×5 perfect form, you can then bring in some kipping pull-ups to learn to do a muscle-up if you so wish to, but not before.
Tight Shoulders
During the entire range of motion you should ensure your shoulders are tight, or phrased another way, don’t shrug your shoulders.
This engages your lats more and puts less pressure on your shoulders.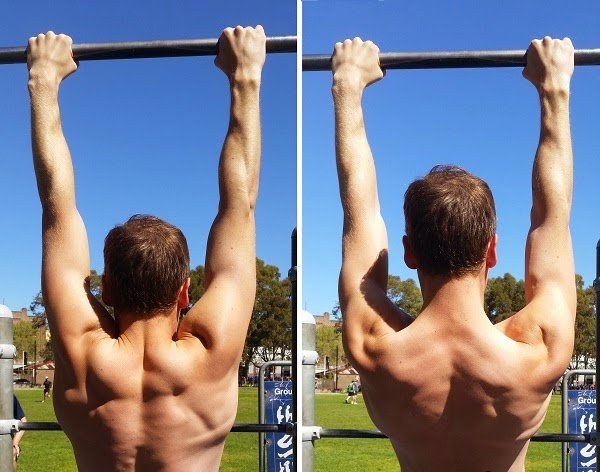
In the picture above, on the left my shoulders are shrugged and not tight – in the right picture, my shoulders are lower and my lats are locked in.
Hand Position
The beginner hand position should always be shoulder width apart.
Any variation on this works your muscles in a more difficult way and I really don’t see the point in doing assisted close arm pull-ups; learn the basic pull-up first, then make it more difficult.
Cadence
I recommend a nice 2 second up, 1 second hold and 2 second back down for pull-ups.
Explosive pull-ups are a good exercise too but get up to 5×5 non kipping slow and controlled pull-ups first.
Breathing
Before attempting the pull-up, take a few deep breaths, I find this gets the muscles ready better for the demands of a challenging exercise.
On your final deep breath, pull yourself up as you exhale, take another breath in on the way down and repeat.
Mentality
I wanted to just write a small piece on the mentality you need to take with you to the bar.
This really is a much bigger topic that I will probably write about in the future as it applies to all exercises.
The pull-up is a demanding exercise and deserves to be respected.
Having said that you have to believe that you are going to not just manage a pull-up, but to conquer it; if not this session, then definitely in the future.
Don’t think to yourself I would like to do a pull-up, say to yourself you are going to do a pull-up!
Why is this so important?
Your brain controls your nervous system, if you approach your training with a negative attitude or a lack of confidence, this will be reflected with your strength.
This is why I mentioned taking a few deep breaths before attempting it, I use this with all my difficult exercises, take a few deep breaths and really psyche yourself up for it.
Even if this means shouting at yourself before attempting it, you may look a little odd but it’s worth it if the bar ends up beneath your chin.
You’ll often see me banging my opposite hand on the grass before attempting a one arm push-up, it gets the adrenaline flowing and fires up your nervous system.
Finally don’t be afraid to let out some noise on your exhale, you’ve probably heard this at a gym, this is all about psyching yourself up and again firing up the nervous system.
Don’t be afraid to look or sound a little silly, those who may laugh at you won’t be laughing when they see the bar beneath your chin!
Negatives
Jumping up to the bar and slowly lowing yourself is a great way of teaching the movement pattern to your nervous system; this is referred to as a negative pull-up.
See the video below for a demonstration of this technique.
Assisted Pull-ups
So how do we train pull-ups without actually being able to perform a pull-up?
The same way you would if you were weight-lifting, remove some of the weight to make it easier.
There’s a few ways we can do this, I’ve outlined some of the more common ways below.
Resistance Bands
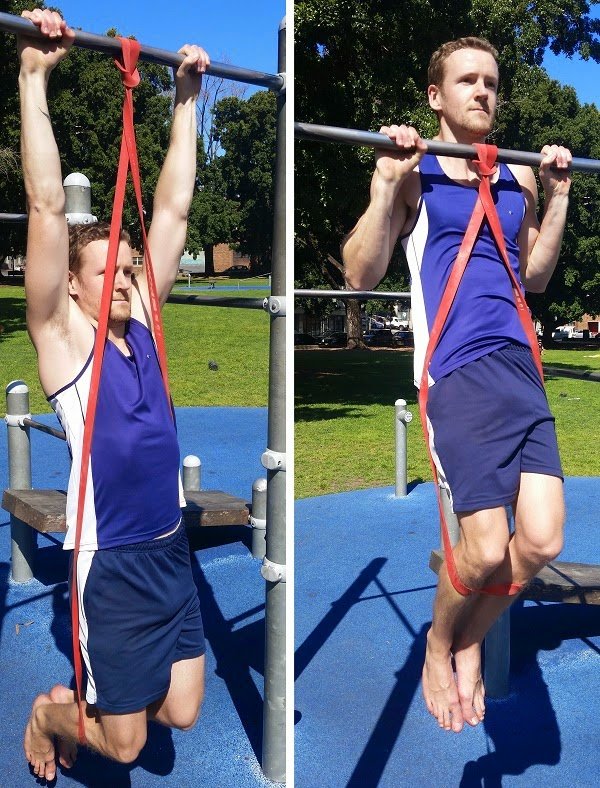
These elastic bands work by wrapping one end around your knees or feet and the other around the bar, thus taking away some of your weight for the exercise.
The advantage is they are really easy to progress with, once you can reach your desired number of sets and reps, move onto the next band, repeat until you’re doing it without.
The only disadvantage with the resistance bands is that you get more assistance at the bottom of the exercise than you do at the top, however this isn’t enough to stop you using them to learn the move.
This is my number one choice for learning pull-ups and the way I have coached all of my trainees to get their first pull-up, furthermore I use these myself to train for the one arm pull-up.
Jackknife Pull-ups
Coach Wade’s number one way of teaching pull-ups, this is also an effective technique if you don’t want to splash any cash on the bands.
Either use a box to put your feet on, or a low bar, then use your legs to assist you with the pull-up; move your legs further away from your arms to make it more difficult.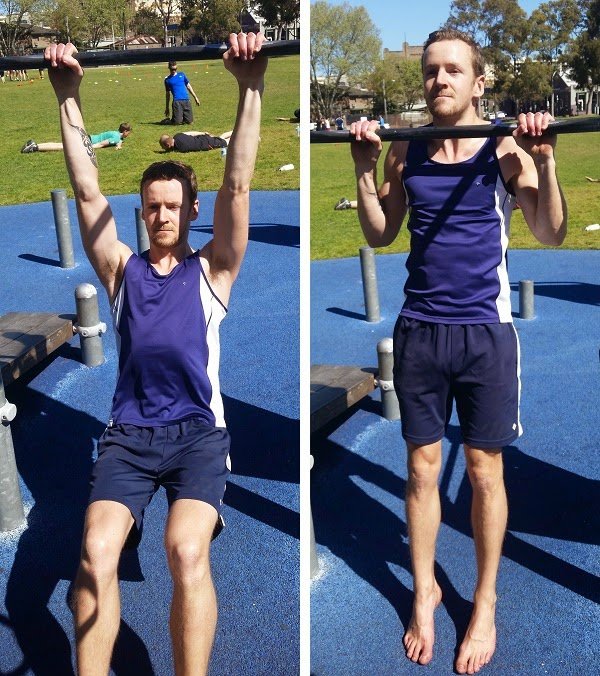
Partner Assisted Pull-ups
If you work with a training partner, simply get them to give you a push on your upper back to help you get over the bar.
Always be sure to tell them how much assistance you require, otherwise they may give too much.
A simple way to assist your pull-ups, however it can be quite difficult to track your progress.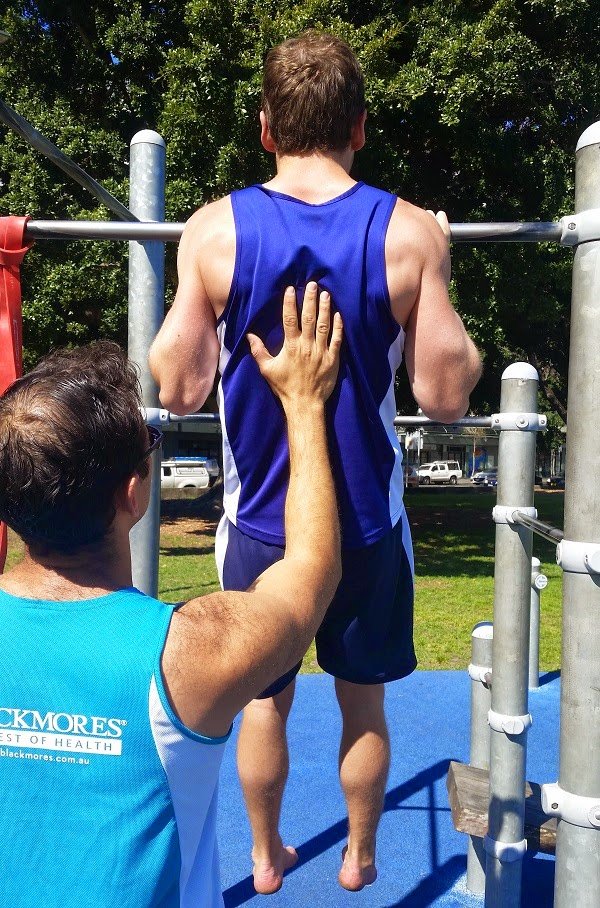
Assisted Pull-up Machine
You may see this machine in your gym, and if so is an alternative to the resistance bands.
It works by putting your knees on a weighted plate, the more weight you have on it, the easier it is.
Again they’re very easy to progress with, their one minor disadvantage is that they offer you very good sturdy support.
This means you don’t have to use your core as much as you would with a bodyweight pull-up.
Grip Training
This is probably the single most neglected exercise for people who are aiming to improve their pull-ups!
If you improve your grip strength then not only will your pull-ups improve, but every single bar related exercise will get stronger and I include weightlifting in that category.
So what mystical piece of equipment should we use to improve our grip?
Maybe some of those grippers you can use at your desk, or carry something heavy like kettle-bells?
Both good exercises, don’t get me wrong, but if you really want to improve your grip strength for pull-ups, then simply grab a hold of your bar and hang there.
If you can’t hang from a bar, you can’t do a pull-up!
Hang there for as long as you can, or a minute, whichever comes first.
Preferably do some kind of finger loosening or strengthening exercise in-between such as finger-tip push-ups, then get straight back on that bar and do it again.
2-4 sets of a minute will give your forearms a pump like Pop-eye, but more importantly will give you the grip strength you require to aid with your pull-ups.
If you want to take this further then I can’t recommend Paul Wade’s Convict Conditioning 2 enough.
Training Plan
If you want to make good progress with your pull-ups then I recommend that you train them at least twice a week, even three times if you can manage it, but try to avoid consecutive days, your body needs some time to recover.
I’ve previously explained the difference between training for strength and mass, for pull-ups I think it’s extremely important to train for strength first. You’re much better doing lower reps with less or no assistance than trying to do 12 reps with quite a bit of assistance.
Negatives should be trained alongside assited pull-ups until you can perform a full pull-up.
I personally prefer to do them before my main pull-up set, with grip training as a finisher, but feel free to play around with this and see what works for you.
Start with the easier grips, once you can do 5×5 unassisted then move onto the harder grip.
Example Plan – Upper / Lower Body Split
This splits the training into 2 separate days, upper and lower body; to see best results you should train 2-4 times a week, with a days rest when needed.
Remember to always warm-up before performing your main sets.
Upper Body
2 sets of
5 x pull-ups (negative)
30 seconds handstand progression
5 sets of
5 x assisted pull-up
5 x dips
5 x inverted rows
5 x push-ups
1-4 sets of
1 minute grip
5 x wall fingertip push-ups
Lower Body / Core
2 sets of
30 seconds plank progression
30 seconds bridge hold progression
5 sets of
5 x leg raises
5 x pistol squat progression
5 x bridge push-up progression
Cardio / movement circuit to finishnd


3 Responses
Love it! Solid break down of the process..
Thanks mate, it’s a bit of an old one, so some of my training methods have evolved since writing this, but will still get people their first pull-up.
So I’m working on an updated version that will be my ultimate guide to pull-ups.
Keep an eye on my blog in the next month or so :)